Getting Docker Up and Running
You are welcome to ask for help in our community chat. Sponsors receive direct technical support via email. Before submitting a support request, try to determine the cause of your problem.
Installation
If you cannot use the docker and docker compose commands, make sure Docker is running on the host you are connected to and your current user has permission to use it.
The following instructions explain how to install Docker:
Alternatively, Podman is supported as a drop-in replacement for Docker on Red Hat-compatible Linux distributions like RHEL, CentOS, Fedora, AlmaLinux, and Rocky Linux.
Ubuntu Linux
If you are using Ubuntu Linux, you can run this script to install the latest Docker version, including the Compose Plugin, on your server in one step:
bash <(curl -s https://setup.photoprism.app/ubuntu/install-docker.sh)
Docker Compose
Our examples require Docker Compose v2 (the docker compose plugin). The standalone docker-compose v1 command was retired by Docker in mid-2023 and is no longer supported.
On some Linux distributions, you may need to install the plugin separately. Use a graphical software package manager or run the following command in a terminal to install the Compose Plugin for Docker on Ubuntu and Debian:
sudo apt update
sudo apt install docker-compose-plugin
If you have older scripts that still call docker-compose, you can add a shell alias for the Compose Plugin so they keep working:
echo 'docker compose "$@"' | sudo tee /bin/docker-compose
sudo chmod +x /bin/docker-compose
With the latest version of Docker Compose, the default config file name is compose.yaml, although the docker compose command still supports legacy docker-compose.yml files for backward compatibility.
Podman Compose
On Red Hat-compatible Linux distributions like RHEL, CentOS, Fedora, AlmaLinux, and Rocky Linux, you can use Podman and Podman Compose as direct replacements for Docker and Docker Compose. The following installs the podman and podman-compose commands if they are not already installed:
sudo dnf update -y
sudo dnf install epel-release -y
sudo dnf install netavark aardvark-dns podman podman-docker podman-compose -y
sudo systemctl start podman
sudo systemctl enable podman
podman --version
We also provide a setup script that conveniently installs Podman and downloads the default configuration to a directory of your choice:
mkdir -p /opt/photoprism
cd /opt/photoprism
curl -sSf https://dl.photoprism.app/podman/install.sh | bash
Please keep in mind to replace the docker and docker compose commands with podman and podman-compose when following the examples in our documentation.
Using Docker
Cannot Connect
If you see the error message "Cannot connect to the Docker daemon", it means that Docker is not installed or not running yet. Before you try anything else, it may help to simply restart your computer.
On many Linux distributions, this command will start the Docker daemon manually if needed:
sudo systemctl start docker.service
On other operating systems, start Docker Desktop and enable the "Start Docker Desktop when you log in" option in its settings.
Connection Aborted
If you see the error message "Connection aborted" or "Connection denied", it usually means that your current user does not have permission to use Docker.
On Linux, this command grants permission by adding a user to the docker group (relogin for changes to take effect):
sudo usermod -aG docker [username]
Alternatively, you can prefix the docker and docker compose commands with sudo when not running as root,
for example:
sudo docker compose stop
sudo docker compose up -d
Note that this will point the home directory shortcut ~ to /root in the volumes: section
of your compose.yaml or docker-compose.yml.
S6 Overlay Error
A container startup error similar to the following indicates that you are using a custom service configuration that is incompatible with our Docker images:
/package/admin/s6-overlay/libexec/preinit:
fatal: /run belongs to uid 0 instead of 100
and we're lacking the privileges to fix it.
In particular, this can happen if you have specified an unsupported user or group ID through the optional user property in your compose.yaml file to run the service, and at the same time added no-new-privileges to the security_opt section.
The supported ID ranges for running our container images are as follows:
- UID: 0, 33, 50-99, 500-600, 900-1250, and 2000-2100
- GID: 0, 33, 44, 50-99, 105, 109, 115, 116, 500-600, 900-1250, and 2000-2100
Please also check if you have specified both a user service property and the corresponding environment variables to set the user and/or group ID under which the "photoprism" service should run, as this is neither required nor recommended:
services:
  photoprism:
    user: "1000:1000"
    environment:
      PHOTOPRISM_UID: 1000
      PHOTOPRISM_GID: 1000
If you need maximum security and do not want to perform any additional startup actions that require root privileges, you can alternatively set the entrypoint and command for the "photoprism" service as follows:
services:
  photoprism:
    restart: unless-stopped
    entrypoint: ["/opt/photoprism/bin/photoprism"]
    command: ["start"]
The default entrypoint script can install additional distribution packages, fix file system permissions, and/or change the UID/GID for the "photoprism" service, as some NAS devices, for example, do not support this from their user interface. So, bypassing it as shown above will disable this functionality and is only recommended for advanced users who are familiar with running container services.
If you are experiencing a similar problem with a custom configuration that we did not provide or recommend, please try changing it to see if that helps before asking our team or community members for support. 🛟
IPTables Firewall
On Linux, Docker manipulates the iptables rules to provide network isolation. This does have some implications for what you need to do if you want to have your own policies in addition to the rules Docker manages.
Wrong MTU Size
If you use Docker on your server or on a virtual machine, technical limitations of the local network or your internet provider can sometimes make it impossible to reach external services such as the Reverse Geocoding API that we operate for our users. In particular, the network cards of virtual machines often do not have the standard Maximum Transmission Unit (MTU) of 1500, but a smaller size like 1492 or 1454.
In this case, you must configure the virtual network cards of your Docker containers so that they have an MTU size that is less than or equal to that of the outgoing network, for example by adding the following to your compose.yaml (or docker-compose.yml) config files:
networks:
  default:
    driver: bridge
    driver_opts:
      com.docker.network.driver.mtu: 1450
All network configuration changes require a restart of the affected services and/or the Docker daemon to take effect.
Viewing Logs
You can run this command to watch the Docker service logs, including the last 100 messages (omit --tail=100 to see them all, and -f to output only the last logs without watching them):
docker compose logs -f --tail=100
A good way to troubleshoot configuration issues is to increase the log level. To enable trace log mode, set PHOTOPRISM_LOG_LEVEL to "trace" in the environment: section of the photoprism service (or use the --trace flag when running the photoprism command directly):
services:
  photoprism:
    environment:
      PHOTOPRISM_LOG_LEVEL: "trace"
      ...
Now restart all services for your changes to take effect:
docker compose stop
docker compose up -d
It can also be helpful to keep Docker running in the foreground while debugging, so that log messages are displayed directly. To do this, omit the -d parameter when (re)starting:
docker compose stop
docker compose up
If you see no errors or no logs at all, you may have started the server on a different host and/or port. There could also be an issue with your browser, browser plugins, firewall settings, or other tools you may have installed.
The default Docker Compose config filename is compose.yaml. For simplicity, it doesn't need to be specified when running docker compose in the same directory. Config files for other apps or instances should be placed in separate folders.
Log Rotation
By default, Docker stores container logs on the host using the json-file logging driver.1 If log rotation is not configured, these files can grow indefinitely and eventually fill up disk space.
To avoid this, you can either configure log rotation per service in your compose.yaml:
services:
  app:
    logging:
      driver: json-file
      options:
        max-size: "10m"
        max-file: "3"
Alternatively, you can configure logging globally for all containers by setting defaults in Docker's daemon.json (so you don't need to repeat this for every service):
{
  "log-driver": "json-file",
  "log-opts": {
    "max-size": "10m",
    "max-file": "3"
  }
}
After changing the Docker daemon configuration, restart Docker and recreate existing containers so the new defaults are applied.
Docker also provides the local logging driver, which is optimized for local storage and performs log rotation by default. If you don't depend on json-file specifically, using local as the global default can be a good choice.
Adding Swap
Note that indexing RAW images and high-resolution panoramas may require additional swap space and/or physical memory above the recommended minimum. We recommend not to set a hard memory limit, unless you are familiar with memory management and understand the implications.
Linux
Open a terminal and run this command to check if your server has swap configured.
swapon --show
Example output:
NAME      TYPE SIZE USED PRIO
/swapfile file  64G  88M   -2
This means you have 64 GB of swap and don't need to add more. Learn how much you need.
Otherwise, run these commands to permanently add 4 GB of swap (or more depending on how much physical memory you have):
sudo -i
fallocate -l 4G /swapfile
chmod 600 /swapfile
mkswap /swapfile
swapon /swapfile
echo '/swapfile none swap sw 0 0' | tee -a /etc/fstab
You can skip sudo -i if you are already logged in as root.
Raspbian
Open a terminal on your Raspberry Pi and run the following command to verify if it has swap configured:
swapon --show
Example output:
NAME      TYPE SIZE USED PRIO
/swapfile file  100M  0B   -2
If no swap has been configured or the command only shows 100 MB, open /etc/dphys-swapfile with a text editor, search for CONF_SWAPSIZE=100 and increase the value to 2048 if your device has 4 GB of physical memory, and 4096 otherwise:
sudo nano /etc/dphys-swapfile
Then restart for the changes to take effect:
sudo reboot
In addition, you can reduce memory usage and improve stability by setting PHOTOPRISM_WORKERS to 1 in your compose.yaml or docker-compose.yml file to limit the number of indexing workers.
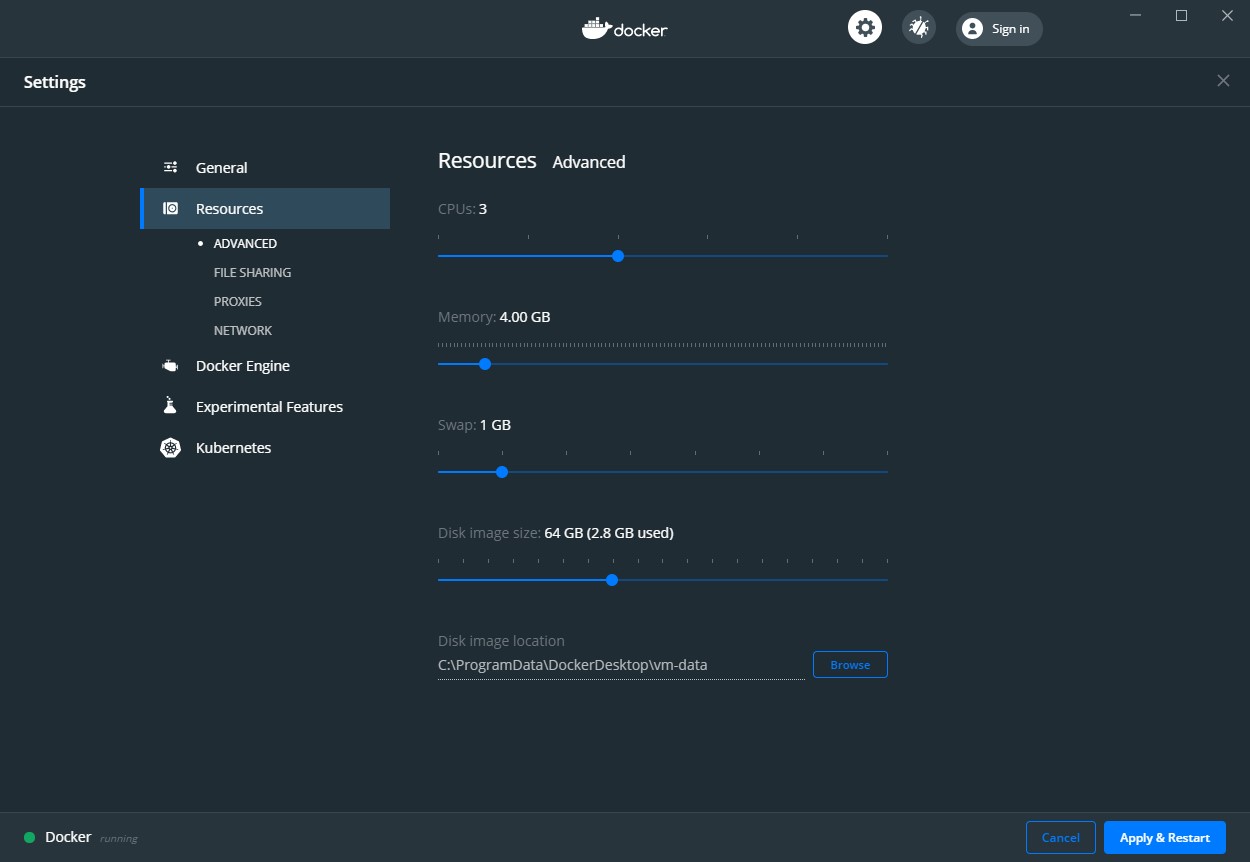
Windows
It is important to increase the Docker memory limit to 4 GB or more when using Hyper-V. The default of 2 GB can reduce indexing performance and cause unexpected restarts. Also make sure you configure at least 4 GB of swap space. Docker Desktop uses dynamic memory allocation with WSL 2, meaning you do not need to change any memory-related settings (depending on which version of Windows and Docker you are using).
macOS
It is important to increase the Docker memory limit to 4 GB or more, as the default of 2 GB can reduce indexing performance and cause unexpected restarts. Also, ensure that you configure at least 4 GB of swap space.
Kernel Security
We recommend disabling Linux kernel security modules like SELinux (Red Hat/Fedora) on private servers, especially if you have no experience configuring them.
If you have working configuration rules for a particular Linux distribution, feel free to share the instructions with the community so that less experienced users can harden their installation without running into problems.
File Permissions
Errors such as "read-only file system", "error creating path", "failed to create folder", "permission denied", or "wrong permissions" indicate a filesystem permission problem:
- Use a file manager, or the commands
ls -alh,chmod, andchownon Unix-like operating systems, to check and change filesystem permissions so all files and folders are accessible - The app and database storage folders must be writable as well: Verify that the services have write permissions and that you have not mounted the folders read-only on your host or via Docker using the
:roflag - If you have configured specific user and group IDs for a service, make sure they match
- If symbolic links are mounted or used within storage folders, replace them with actual paths
- It may help to add the
:zmount flag to volumes when using SELinux (Red Hat/Fedora) - When mounting folders that only root has access to, you may have to prefix the
dockeranddocker composecommands withsudoon Linux if you are not already logged in as root
An easy way to test for missing permissions is to (temporarily) remove restrictions and make the entire folder accessible to everyone:
sudo chmod -R a+rwX [folder]
Be very careful when changing permissions in shared hosting environments. If you are using PhotoPrism on corporate or university servers, we recommend that you ask your IT help desk for advice.
Overlay Volumes
Depending on overlay file system support, it is possible to mount additional host folders as sub folders of /photoprism/originals (or other storage folders), for example:
volumes:
  - "/home/username/Pictures:/photoprism/originals"
  - "/example/friends:/photoprism/originals/friends"
  - "/mnt/photos:/photoprism/originals/media"
For this to work, you should have the cgroupfs-mount package installed, as shown in the installation script we provide.
You may otherwise find that files added to the mounted folders are not visible on the host, and data loss may occur.
We recommend that you start with a simple configuration without overlay volume mounts or path placeholders like ~, and only move on to a more complex setup once this works.
Disk Space
In case the logs show "disk full", "quota exceeded", or "no space left" errors, either the disk containing the storage folder is full (get a new one or use a different disk) or a disk usage limit is configured, for example in the Docker, Kubernetes, or Virtual Machine configuration (remove or increase it):
- on Linux and other Unix-like operating systems, the available disk space can be viewed by running
df -hin a terminal - if you are using Kubernetes, Docker Desktop, Hyper-V, or a Virtual Machine, they have their own settings to adjust the size of storage, RAM, and swap
- for details, refer to the corresponding documentation
Start a full rescan if necessary, for example, if it looks like thumbnails or pictures are missing.
Network Storage
Shared folders that have already been mounted on your host under a drive letter or path can be used with Docker containers like any other directory. As shown below, certain types of network storage can alternatively be mounted directly with Docker Compose.
Please note that the required system dependencies must be installed on your computer in order to mount NFS (Unix/Linux) and/or CIFS shares (Windows/Mac), e.g. the nfs-client and cifs-utils packages on Ubuntu Linux. Also make sure that your Docker version and operating system are up-to-date, and that the latest Subsystem for Linux (WSL) is installed if you have a Windows PC.
Never store database files, e.g. used by MariaDB or SQLite, on an unreliable device like a USB stick, SD card or network drive as this leads to poor performance and can also result in data loss.
Unix / NFS
Follow this compose.yaml example to mount Network File System (NFS) shares e.g. from Unix servers or NAS devices:
services:
  photoprism:
    # ...
    volumes:
      # Map named volume "originals"
      # to "/photoprism/originals":
      - "originals:/photoprism/originals"
  mariadb:
    # ...

# Specify named volumes:
volumes:
  originals:
    driver_opts:
      type: nfs
      # Authentication and other mounting options:
      o: "addr=1.2.3.4,username=user,password=secret,soft,rw,nfsvers=4.1"
      # Mount this path:
      device: ":/mnt/example"
device should contain the path to the share on the NFS server, note the : at the beginning. In the above example, the share can be mounted as the named volume originals. You can also choose another name as long as it is consistent.
Driver-specific options can be set after the server address in o, see the nfs manual page. Here are some examples of commonly used options:
nfsvers=3,nfsvers=4, ornfsvers=4.1to specify the NFS versionnolock(optional): Remote applications on the NFS server are not affected by lock files inside the Docker container (only other processes inside the container are affected by locks)timeo=n(optional, default 600): The NFS client waitsntenths of a second before retrying an NFS requestsoft(optional): The NFS client aborts an NFS request afterretrans=nunsuccessful retries, otherwise it retries indefinitelyretrans=n(optional, default 2): Sets the number of retries for NFS requests, only relevant when usingsoft
When you are done, please restart all services for the changes to take effect.
Because some operating environments and file systems do not enforce character set encodings, NFS v4.1 supports the fs_charset_cap attribute, which indicates the UTF-8 capabilities to the client.
SMB / CIFS
Follow this compose.yaml example to mount CIFS network shares, e.g. from Windows, NAS devices or Linux servers with Samba:
services:
  photoprism:
    # ...
    volumes:
      # Map named volume "originals"
      # to "/photoprism/originals":
      - "originals:/photoprism/originals"
  mariadb:
    # ...

# Specify named volumes:
volumes:
  originals:
    driver_opts:
      type: cifs
      o: "iocharset=utf8,username=user,password=secret,rw"
      device: "//host/folder"
Then restart all services for the changes to take effect. Note that related values must start at the same indentation level in YAML and that tabs are not allowed for indentation. We recommend using 2 spaces, but any number will do as long as it is consistent.
We kindly ask you not to report bugs via GitHub Issues unless you are certain to have found a fully reproducible and previously unreported issue that must be fixed directly in the app. Ask for technical support if you need help, it could be a local configuration problem, or a misunderstanding in how the software works.
-
When using Docker's default
json-filelogging driver on Linux, logs are typically stored at<data-root>/containers/<container-id>/<container-id>-json.log(usually/var/lib/docker/containers/...unless the Docker data root was changed). ↩