Single Sign-On via OpenID Connect
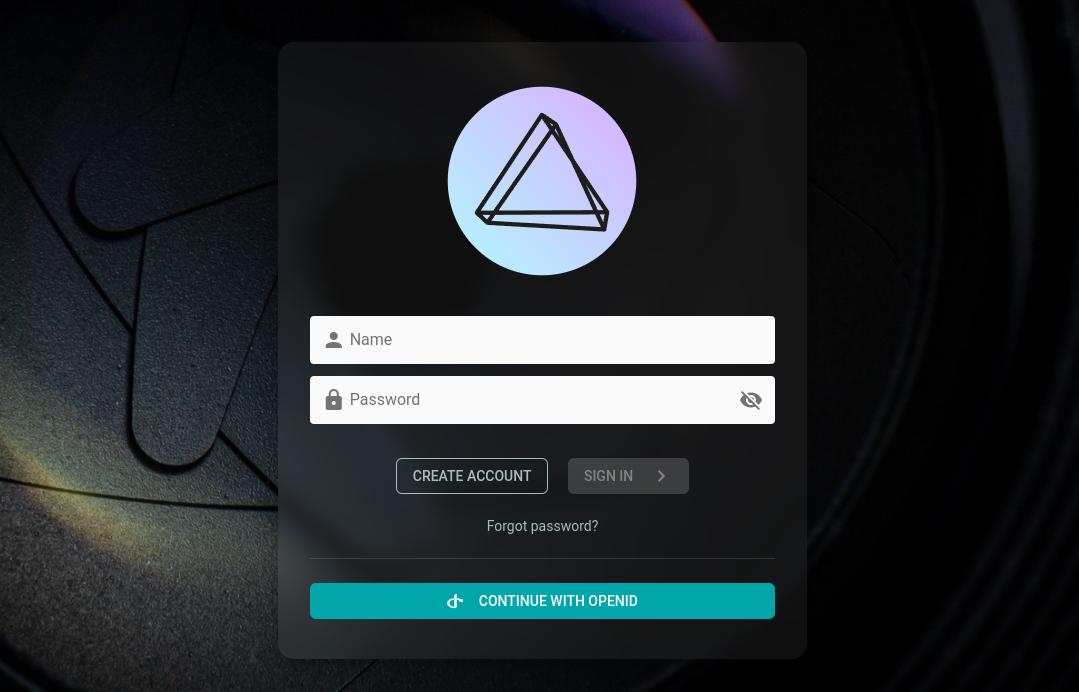
OpenID Connect (OIDC) extends OAuth 2.0 to allow users to log in and optionally register through an external identity provider instead of manually entering a username and password:

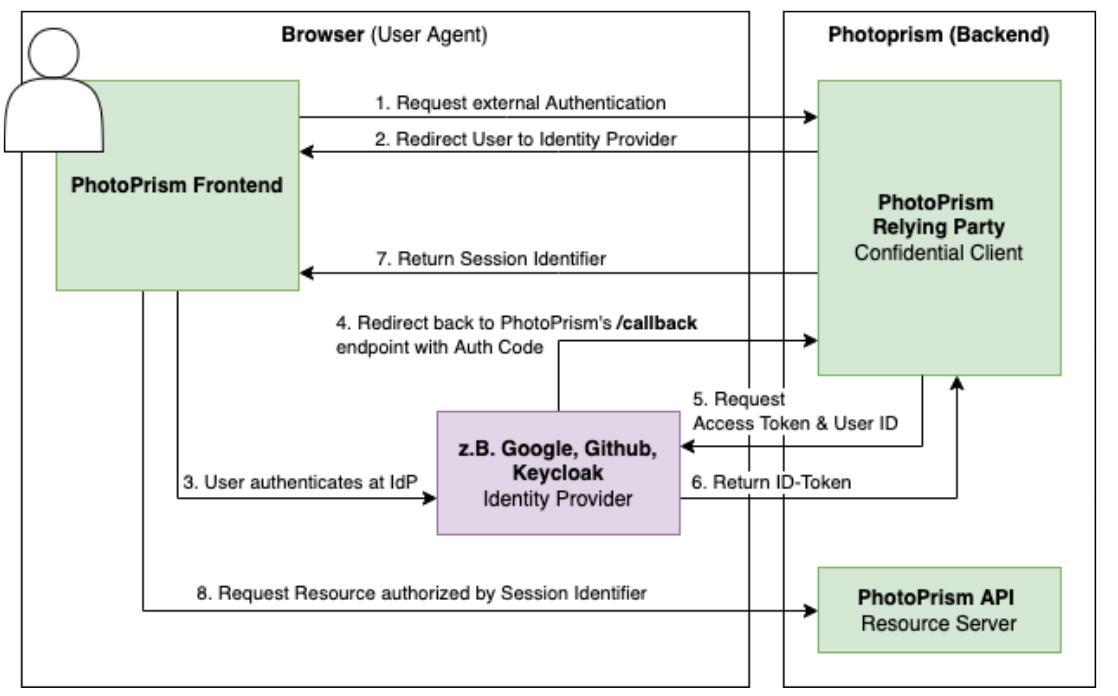
Authentication Flow

Config Options
| Environment | CLI Flag | Default | Description |
|---|---|---|---|
| PHOTOPRISM_OIDC_URI | --oidc-uri | issuer URI for single sign-on via OpenID Connect, e.g. https://accounts.google.com |
|
| PHOTOPRISM_OIDC_CLIENT | --oidc-client | client ID for single sign-on via OpenID Connect |
|
| PHOTOPRISM_OIDC_SECRET | --oidc-secret | client SECRET for single sign-on via OpenID Connect |
|
| PHOTOPRISM_OIDC_SCOPES | --oidc-scopes | openid email profile address | client authorization SCOPES for single sign-on via OpenID Connect |
| PHOTOPRISM_OIDC_PROVIDER | --oidc-provider | custom identity provider NAME, e.g. Google |
|
| PHOTOPRISM_OIDC_ICON | --oidc-icon | custom identity provider icon URI |
|
| PHOTOPRISM_OIDC_REDIRECT | --oidc-redirect | automatically redirect unauthenticated users to the configured identity provider | |
| PHOTOPRISM_OIDC_REGISTER | --oidc-register | allow new users to create an account when they sign in with OpenID Connect | |
| PHOTOPRISM_OIDC_USERNAME | --oidc-username | preferred_username | preferred username CLAIM for new OpenID Connect users (preferred_username, name, nickname, email) |
| PHOTOPRISM_OIDC_WEBDAV | --oidc-webdav | allow new OpenID Connect users to use WebDAV when they have a role that allows it | |
| PHOTOPRISM_DISABLE_OIDC | --disable-oidc | disable single sign-on via OpenID Connect, even if an identity provider has been configured |
Your PhotoPrism instance and the OpenID Connect Identity Provider (IdP) must be accessible via HTTPS and have valid TLS certificates configured for it. Please also make sure that the hostname in the Redirect URL configured on the IdP matches the Site URL used by PhotoPrism. Single sign-on via OIDC can otherwise not be enabled.
Identity Providers
To allow users to log in via OIDC, you can either set up and use a self-hosted identity provider such as ZITADEL or Keycloak, or choose a public authentication service such as those provided by Google, Microsoft, GitHub, or Amazon.
Single sign-on can then be configured automatically through your identity provider's /.well-known/openid-configuration service discovery endpoint, for example:
Issuer URI
The Issuer URI in your configuration must match the issuer value returned by the /.well-known/openid-configuration endpoint of your OpenID Connect Identity Provider (IdP), for example https://accounts.google.com if you use Google for authentication.
You may not modify the URI in any way, e.g. by adding or omitting slashes at the end. If the values do not match, the validation will fail and users cannot be redirected to your provider's login page. For security reasons, only a generic error message is displayed in this case.
Redirect URL
The Redirect URL that must be specified when registering a new client with an Identity Provider is as follows, where {hostname} must be replaced by the hostname in the Site URL, e.g. configured via PHOTOPRISM_SITE_URL:
https://{hostname}/api/v1/oidc/redirect
Note that both the Site URL configured for your instance and the Redirect URL must start with https:// and that their hostnames must match, as the use of secure connections is a strict requirement for OpenID Connect.
Local Development
Our development environment comes with a pre-configured Keycloak OIDC Identity Provider running at https://keycloak.localssl.dev/ for local testing:
An admin account for managing users and a user account for testing single sign-on are pre-registered. Both have the password photoprism.
Please do not use this test identity provider in a production environment as its configuration is not secure.
Preferred Username
When a new user signs in with OpenID Connect1, their preferred username may already be registered. In this case, a random 6-digit number is appended to resolve the conflict.
The config option PHOTOPRISM_OIDC_USERNAME allows you to change the preferred username claim for new accounts from preferred_username to name, nickname or verified2 email. The other claims are used as fallback if no value is returned for the configured claim. Names are changed to lowercase so that, for example, "John Doe" becomes "john.doe".
Existing Accounts
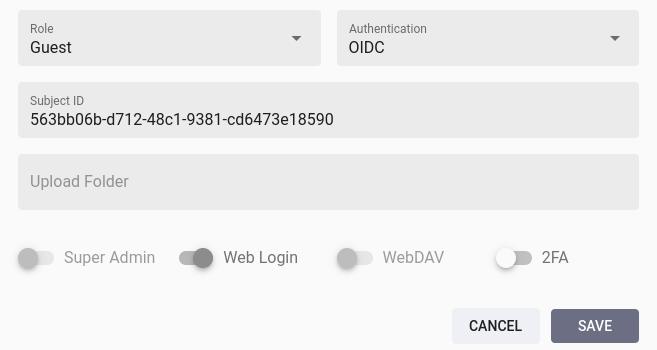
Super admins can manually connect existing user accounts3 under Settings > Users by changing the authentication to OIDC and then setting the Subject ID to match the account identifier from the configured Identity Provider:

The Edit Account dialog may additionally contain a text field for the Issuer URL. It does not need to be entered manually as it is set automatically after the first login.
Alternatively, you can run the following command in a terminal to allow authentication via OIDC and set a Subject ID to connect existing accounts:
photoprism users mod --auth=oidc --auth-id=[sub] [username]
Passwords
Changing the authentication of an account to OIDC does not remove a previously set password, so that it can still be used to log in (optionally also in combination with 2FA).
If a local password has been set for an account, you can remove it by running the following command in a terminal:
photoprism passwd --rm [username]
Super admins can alternatively set the account password to a long random value through the Admin Web UI or CLI to effectively prevent local authentication.
Deleting Accounts
Deleted accounts remain linked to the Subject ID, so logging in via OIDC is no longer possible and no new account can be registered for the same Subject ID either.
If you wish to change the connected user account or create a new account instead, you must therefore change the authentication of the old account e.g. to None before deleting it:
photoprism users mod --auth=none [username]
To restore a previously deleted account, admins can follow the same steps as for creating a new account with the same username through the Admin Web UI or the photoprism users add command. You will then be asked if you want to restore the account.
Service Discovery
It is not yet possible to use PhotoPrism as an Identity Provider, since not all the required endpoints and grant types have been fully implemented.
However, querying the /.well-known/openid-configuration endpoint shows what has already been implemented, so the missing capabilities can be identified and added over time:
Related Issues
- Auth: Add support for single sign-on via OpenID Connect (OIDC) #782
- Auth: Add
userinfoAPI endpoint to get information about the logged in user #4369 - Auth: Add
authorizeAPI endpoint to implement the authorization code flow #4368
Software Libraries
Protocol References
- https://openid.net/developers/how-connect-works/
- https://dl.photoprism.app/pdf/publications/20220113-Volkmann_OpenID_Connect_Thesis.pdf
- https://oauth.net/openid-for-verifiable-credentials/
- https://developers.google.com/identity/openid-connect/openid-connect
- https://www.ory.sh/docs/oauth2-oidc/authorization-code-flow
- https://developer.okta.com/docs/concepts/oauth-openid/
- https://developer.okta.com/docs/reference/api/oidc/
- https://developer.okta.com/docs/reference/api/oauth-clients/
- https://auth0.com/docs/authenticate/protocols/openid-connect-protocol
- https://learn.microsoft.com/en-us/entra/identity-platform/scopes-oidc#openid-connect-scopes
- https://owncloud.dev/clients/rclone/webdav-sync-oidc/
- https://blog.cubieserver.de/2022/complete-guide-to-nextcloud-oidc-authentication-with-authentik/
- https://auth0.com/docs/get-started/applications/configure-applications-with-oidc-discovery
- https://connect2id.com/products/server/docs/api/authorization
- https://www.authlete.com/developers/definitive_guide/authorization_endpoint_spec/
- https://www.oauth.com/oauth2-servers/authorization/the-authorization-request/
- https://www.oauth.com/oauth2-servers/authorization/requiring-user-login/
- https://www.oauth.com/oauth2-servers/authorization/the-authorization-interface/
- https://www.oauth.com/oauth2-servers/authorization/the-authorization-response/
Session Management
- https://openid.net/specs/openid-connect-session-1_0.html#OPiframe
- https://zitadel.com/blog/session-timeouts-logouts
- https://ldapwiki.com/wiki/Wiki.jsp?page=OpenID%20Connect%20Session%20Management
- https://ldapwiki.com/wiki/Wiki.jsp?page=OpenID%20Connect%20Back-Channel%20Logout
- https://openid.net/specs/openid-connect-rpinitiated-1_0.html
- https://auth0.com/docs/authenticate/login/logout/log-users-out-of-auth0
- https://medium.com/@robert.broeckelmann/openid-connect-logout-eccc73df758f
Frequently Asked Questions
Is it possible to set a default role for new OIDC users?
For security reasons, our Personal Editions currently default to the Guest role, which admins can then upgrade after checking the eligibility of newly registered accounts.
Can I configure a custom claim for the preferred username?
You can choose between preferred_username, name, nickname and verified2 email, where preferred_username is the default. The other claims are used as fallback if no value is returned for the configured claim.
Please note that it is currently not possible to use other standard or non-standard claims, as these may not be suitable for generating a username and no logic is implemented for doing so.
What if my provider does not return any claims for generating a username?
Certified OIDC Identity Providers, as well as public service providers such as Google, should support (at least) a subset of the standard claims that PhotoPrism can use to generate a username for newly registered accounts. These are preferred_username, name, nickname and verified2 email, where preferred_username is the default.
If only an unverified email address2 or none of these claims are returned, we recommend that you report this to the vendor of the Identity Provider you are using, as this is also likely to cause problems with other software. In a future release, we may offer additional config options to work around this issue, e.g. by generating a random username. However, this is currently not possible.
-
PHOTOPRISM_OIDC_REGISTERmust be set to"true"to allow new users to create an account via OpenID Connect. ↩ -
The
email_verifiedflag must be set by the OIDC Identity Provider so that theemailaddress can be used to send notifications and/or confirm the identity of users. If we do not insist on verification, this could otherwise have a negative impact on trust and security. ↩↩↩↩ -
Admins are unable to change the authentication method of their own user account through the Admin Web UI, so they cannot accidentally lock themselves out e.g. by setting it to None. ↩