Using HTTPS
This guide shows you how to enable HTTPS/TLS, configure existing server certificates, and obtain new certificates as needed. If you have suggestions for improvement, please let us know by clicking to send a pull request.
Why Use Encryption?
If you install PhotoPrism on a shared server so that it is not only accessible to the local host, always secure the connection using HTTPS. Your files and passwords will otherwise be transmitted in clear text and can be intercepted by anyone, including your provider, hackers, and governments. Backup tools and file synchronization apps may also refuse to connect.
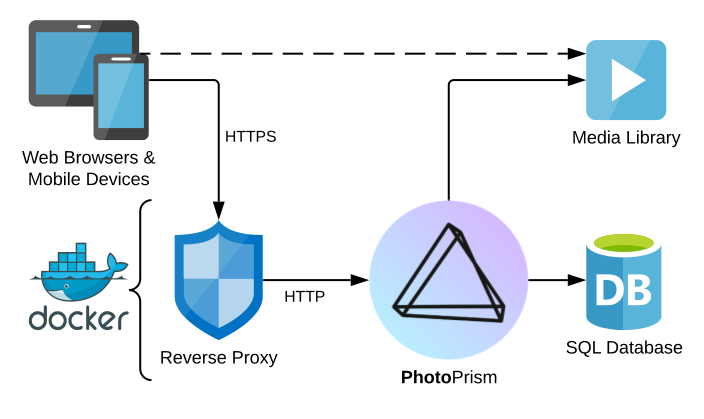
HTTPS connections use Transport Layer Security (TLS) for encryption. TLS is a network protocol that establishes an encrypted connection to an authenticated peer over an untrusted network.
How To Enable HTTPS
You have the following options to enable HTTPS/TLS when using our latest stable release. Note that after adding or updating certificates, it is required to restart PhotoPrism for the changes to take effect.
1. HTTPS Reverse Proxy
To run your instance behind an HTTPS reverse proxy like Traefik, we recommend that you explicitly disable TLS in PhotoPrism by setting PHOTOPRISM_DISABLE_TLS to "true" in your compose.yaml or docker-compose.yml configuration:
services:
  photoprism:
    # ...
    environment:
      PHOTOPRISM_SITE_URL: "https://www.example.com/"
      PHOTOPRISM_DISABLE_TLS: "true"
Especially if your server also has other web applications installed and/or a proxy with working HTTPS is already in place, this may be the best option.
2. Self-Signed Certificate
services:
  photoprism:
    # ...
    environment:
      PHOTOPRISM_SITE_URL: "https://www.example.com/"
      PHOTOPRISM_DISABLE_TLS: "false"
      PHOTOPRISM_DEFAULT_TLS: "true"
      PHOTOPRISM_INIT: "https"
3. Custom Certificate
To use your own certificates, you can add a custom TLS certificate and private key to the storage/config/certificates folder with the filenames www.example.com.crt and www.example.com.key, replacing www.example.com with the actual server domain. For this, you can set the same config options as when using a self-signed certificate (see above).
Alternatively, you can specify a custom TLS certificate (*.crt) and private key (*.key) filename within the storage/config/certificates folder using the PHOTOPRISM_TLS_CERT and PHOTOPRISM_TLS_KEY environment variables in your compose.yaml or docker-compose.yml, or use the corresponding command flags:
services:
  photoprism:
    # ...
    environment:
      PHOTOPRISM_SITE_URL: "https://www.example.com/"
      PHOTOPRISM_TLS_CERT: "site.crt"
      PHOTOPRISM_TLS_KEY: "site.key"
      PHOTOPRISM_DISABLE_TLS: "false"
      PHOTOPRISM_DEFAULT_TLS: "true"
      PHOTOPRISM_INIT: "https"
We recommend that you keep the PHOTOPRISM_DEFAULT_TLS option enabled so that you can always connect securely over HTTPS even if there is a problem with your custom certificates.
4. Automatic Let's Encrypt Certificates
If your server has a public domain name and no reverse proxy, PhotoPrism can obtain and renew a free certificate from Let's Encrypt by itself. This is enabled when the site URL starts with https:// and contains a public domain name, and an email address for the Let's Encrypt account is set with PHOTOPRISM_TLS_EMAIL:
services:
  photoprism:
    image: photoprism/photoprism:latest
    # ...
    ports:
      - "443:2342" # Let's Encrypt connects to port 443 of the domain
    environment:
      PHOTOPRISM_SITE_URL: "https://photos.example.com/"
      PHOTOPRISM_TLS_EMAIL: "admin@example.com"
      PHOTOPRISM_DISABLE_TLS: "false"
PhotoPrism then serves HTTPS on its regular port and completes the Let's Encrypt challenge on that same port, so please make sure that:
- the DNS records of the domain point to your server; if it has an AAAA record, port 443 must also be reachable over IPv6
- port 443 of the domain reaches PhotoPrism, e.g. with the port mapping shown above or a port forwarding on your router
storage/config/certificatesis writable and on persistent storage, so certificates are reused after a restart
The certificate is requested with the first HTTPS request after startup, which may therefore take a few seconds. Port 80 is not used, and plain http:// requests to PhotoPrism's port are answered with 400 Bad Request. Certificates are only requested for the domain in the site URL, not for IP addresses, localhost, or special-use names such as .local or .internal. While this option is enabled, PHOTOPRISM_TLS_CERT and PHOTOPRISM_TLS_KEY are ignored.
Using a Reverse Proxy
Since Let's Encrypt verifies the domain during the encrypted handshake with PhotoPrism, a reverse proxy in front of it must pass HTTPS connections through without decrypting them. With Traefik, you can use a TCP router with TLS passthrough instead of the usual HTTP router labels:
services:
  photoprism:
    # ...
    labels:
      - "traefik.enable=true"
      - "traefik.tcp.routers.photoprism.rule=HostSNI(`photos.example.com`)"
      - "traefik.tcp.routers.photoprism.entrypoints=websecure"
      - "traefik.tcp.routers.photoprism.tls.passthrough=true"
      - "traefik.tcp.services.photoprism.loadbalancer.server.port=2342"
In this case, do not publish PhotoPrism's port as shown above, since Traefik already listens on port 443. If your proxy terminates HTTPS itself, use option 1 instead.
Strict Transport Security
PhotoPrism Plus and Pro also send a Strict-Transport-Security header in this mode, which tells browsers to only connect over HTTPS for one year by default. You can adjust it with the PHOTOPRISM_STS_SECONDS, PHOTOPRISM_STS_SUBDOMAINS, and PHOTOPRISM_STS_PRELOAD config options, or disable it with PHOTOPRISM_DISABLE_STS. While you are testing your setup, we recommend setting PHOTOPRISM_STS_SECONDS to a short time such as "300".
Let's Encrypt limits failed validations and duplicate certificates per domain. If a certificate cannot be obtained, PhotoPrism logs a warning that you can view in the service logs. Please fix the cause before restarting it repeatedly.
Obtaining Certificates
Valid server certificates can be obtained either from a commercial Certificate Authority (CA) like ZeroSSL or free of charge from Let's Encrypt:
Let’s Encrypt
 Let's Encrypt is an automatic certificate authority that provides you with free HTTPS/TLS certificates. Many web servers and reverse proxies such as Traefik and Caddy have integrated support for obtaining single-domain certificates if your server is accessible on port 80 over the public Internet.
The creation of certificates for servers that are not publicly reachable or that are valid for all subdomains (wildcard) is alternatively possible with the LEGO Let's Encrypt client. If you use Docker and DigitalOcean's free DNS service, the command to run will look as follows (replace the certificate path, access token, domain names, and email address with the appropriate values):
docker run --rm -v "/path/to/certificates:/data/" \
-e DO_AUTH_TOKEN=Your_Access_Token goacme/lego run -a \
-d "example.com" -d "*.example.com" --email="you@example.com" \
--dns=digitalocean --dns.timeout=180 --path=/data
Note that this verification method only works if you use a supported DNS provider that LEGO can access through an API. Please refer to its documentation for details, as each provider requires different authentication credentials. If you are using DigitalOcean, you can create the required access token in your customer dashboard and replace Your_Access_Token with it.
ZeroSSL
 ZeroSSL is a widely trusted commercial certificate authority with more than 500,000 customers worldwide. Its headquarters are located in Vienna, Austria.
Compared to Let's Encrypt, you can also create and revoke certificates through a user-friendly web interface, obtain certificates with a validity of more than 90 days, and choose between additional domain verification methods.1
Troubleshooting
Enabling Trace Log Mode
A good way to troubleshoot configuration issues is to increase the log level. To enable trace log mode, set PHOTOPRISM_LOG_LEVEL to "trace" in the environment: section of the photoprism service (or use the --trace flag when running the photoprism command directly):
services:
  photoprism:
    environment:
      PHOTOPRISM_LOG_LEVEL: "trace"
      ...
Then restart all services for your changes to take effect:
docker compose stop
docker compose up -d
Viewing Docker Service Logs
You can run this command to check the server logs for warnings and errors, including the last 100 messages (omit --tail=100 to see them all, and -f to output only the last logs without watching them):
docker compose logs -f --tail=100
Determining Your Public IP Address
If you have a domain name and want to set up a public host entry for your home network, you can use one of the following services to see your public IP address, i.e. the IP address that others outside your home network can use to reach you:
Failed to Find Any PEM Data in Key Input
This error can indicate that your key file starts with an unexpected Byte Order Mark (BOM):
- https://www.google.com/search?q=failed+to+find+any+pem+data+tls+golang
- https://stackoverflow.com/questions/57596920/failed-to-find-any-pem-data-in-key
While BOMs are not strictly forbidden, there is only one way to encode UTF-8, and so they are not needed and extremely rare. As a result, a lot of software has problems with them.
You should be able to fix this by opening the file with a regular text or code editor (not Notepad) and then saving it again. Finally, restart all services for the changes to take effect:
docker compose stop
docker compose up -d
Our examples use the new docker compose command by default. If your server does not yet support it, you can still use docker-compose or alternatively podman-compose on Red Hat-compatible distributions.
-
We may receive a credit when you sign up through our link, which helps us fund the project infrastructure. ↩